Showing posts with label Framing. Show all posts

Wednesday, June 15, 2011

Insert Witty Title Here...

Been busy today. Lets get to it...

First I put a self-leveling floor patch on the scrapped floor. There were plenty of divots that  This will help once the underlayment is laid down...


I went on with the exterior. I put some attention to the roof. Here is the black water tank vent cap...
You can see the PO put a thick layer of roofing tar on the vents. I managed to scrape most of the tar away and remove the cap so I can clean it up and reseal it properly...

Apparently, I have never took a shot of the roof vent before I took it out. I can assure you it was covered with the same thick roofing tar. Here is the hole with the skin cleaned up to get ready for the Fantastic Fan...
If you have this on your roof you can use a heat gun and warm the tar then scrape it off with a putty knife. Once you get it all off you can go back and clean the skin with Goof Off and a cloth. It dissolves the residue well. 

I went back inside and removed the upper kitchen cabinets so could remove the damaged ceiling panel completely...
I pulled the panel completely and re framed the ceiling area. If the skin and frame looks a bit separated its because I shimmed the vent area so water will run away from the vent...
And test fit the Fantastic Fan...
And insulated the area...
Ignore the sloppy tape job. I was getting tired and wasn't in the mood anymore.

More to come. Stay tuned...

Tuesday, June 14, 2011

Moving Right Along...

This post isn't as timely as it should be. I have been doing work that takes a bunch of time but it is what it is. You can't rush some things.  Lets get to it...

I managed to get all of the insulation in all of the walls. It is such a slow process just because each panel is a different size. I think all of this will help. Here is the curbside...
The rear...
The blue paint is left over exterior paint from another project that I applied to all of the new framing to help keep water from soaking in if it does get behind the skin. It isn't bulletproof but it is better than nothing at all. The street side from the rear...
The street side from the front...
I have managed to stuff it in every nook and cranny that I could. I wish I could get every area but most areas aren't accessible doing the type of restoration we are doing.

Moving on. I put the final coat on the A Frame and coupler area. I talked about it a little bit in this post but I should explain the process a bit more. I used chemical stripper on the old paint. Scraping as much paint as I could off of the areas. Then I used a wire wheel and a flap disk to remove the rust and remaining paint. I primed with same Rustoleum that I used on the entire frame. I then used Rustoleum Professional in the aluminum color. I ran out of that paint so I finished it off with Rustoleum Silver Metallic in rattle cans. I think it looks a ton better than it did originally...  
Here is the before and after...
I also did the same thing on the bumper. Here is the final coat...
And the before and after...
This bumper needs to replaced but that may come farther down the road. The rust removal and paint will help    keep it serviceable for a while longer.

I also FINALLY got the floor tiles and linoleum scraped off. That project seemed to take entirely too long. I don't know if I have mentioned it before but you really have the right tool for that. I started with my Dremel Multi-Max and the rigid scraper. It tool took WAY too long. It would work if you had a tiny section to remove but it isn't the right tool. I bought a heavy duty floor scraper with replaceable blades. Like this one..
It works so much better because it really is the right tool for the job. Those tiles seemed to fail after all this time but that glue or mastic or whatever it is that they used to adhere to tiles is a bear to scrape up. Wear your mask and all of that good stuff too. They say that the tiles contain asbestos. I wore my respirator because I am sure those little disposable ones won't do the trick. Here is the work done...
Another shot...

I cut and fit the new closet panel also...

I pulled the ceiling panel to start work on that area...

I should have new stuff soon. I have written out my to-do list. I won't bore you with it but it is really long when you write it out like that. It does motivate me to push on. Stay tuned for more...

Wednesday, June 1, 2011

A Bit More Progress...

It has been awhile since my last post but I have been working a few hours here and there. Here is what has happened since my last post...

The door got put back together and sealed. Here I had taped off the "Z" stripe for polish...

I used the felt buff chucked in my drill and some brown compound to give it a good shine..

I then taped off the stripe and primed the door...
It is now set aside waiting for paint.

I removed the section of the floor where the leaky door had started to rot and delaminate the floor...

Let me apologize for the crummy pictures. I swear this camera is getting worse and worse. Here is the new section of floor installed...

You might have noticed that the closet panel was also removed. I didn't want to take this out but it is just too far gone..

I have been hunting for rot and trying to find it and remove it. Here is some more rot that must have come from a leaky black water tank vent cap...

I have also been tackling replacing the framing. I removed all of the rotted framing and tried to make the new framing more substantial. Here is the curbside done up to the door...

A before and after of the baggage door framing...

Again, sorry about these crappy pictures. Here is the curbside wheel well framing...

Here is the street side framing done all the way up to the front...

Once I was done with each side framing I went to the back to finish that up. I had bought a Hehr Standard window for the rear window which was gone. I had never really fit the window in the hole to because we had the rear window sealed up with plastic since we bought the trailer. It had always been in the back of my mind. Really because I wanted to see if the PO had altered the opening to fit the AC unit in the window opening. I didn't think that the actual replacement window wouldn't fit. Talk about a oh $#!@ moment. I study a lot about Shastas but even I didn't know (or even think) about the fact that an Airflyte would have a larger window than a 16 SC. Luckily, I discovered this at this point in the work. I just needed to make the opening larger to accommodate the bigger window. I removed all of the rear cross members to start fresh...

I redid all of the rear framing which was going to get redone anyway...

Going back to a few previously discussed items...

Here is a horrible shot of the grinding, priming and painting I did on the entire frame...
 I also did the wheel wells which probably benefited more from this. They are on the verge of rusting away. I think the rust removal and paint will keep them serviceable for a while. All of this sort of thing is really easier when you do a complete frame off but that wasn't in the cards this go around. I had to make due with the options I have. It was a lot of work to spend that much time under the trailer but I feel better knowing I have done what I can to make sure it isn't rusting away.

I also got the new tires mounted on the rims...
Again. These will probably end up another color but I can do that later. I am still hunting for a good buy on vintage 15" caps. I have really been eyeing up early 50's Oldsmobile caps. I like the design they had. Then again I keep seeing other caps on ebay that I like also. Maybe at some point I can have more than one set of caps and could change them out to suit whatever mood we are in.

I am sure I will have more updates soon. Stay tuned...

Saturday, April 30, 2011

More Work. Nothing Done...

Here we are again. I have done a ton of work on the trailer lately but nothing really done. I really want to keep up on the blog regardless. If I fall too far behind it takes forever to update this thing. Resizing pictures, uploading pics, writing stupid and poorly written comments... It all takes time. Enough complaining. Let's get to it then...

Where to start? I removed the curbside rear skin to see the horror. And really it wasn't that bad. I was surprised...

The back lower corner has a bit of rot. Nothing horrible or nothing that can't be fixed...

There is some more rot in the wheel well area...
All of this is getting replaced of course.

I removed the wheels and had the tires removed from the rims at a local shop so I could pay the rims some attention. As you can see from the picture above it is still wearing the Chrysler caps the PO had put on it. One was destroyed when it went flying off on the highway during the initial recovery. I had assumed that both wheels were the same. Not so. One was a older rim and one a slightly newer replacement according to my local shop. I don't know why but I didn't care. I needed to find a spare so maybe I could find a match to one of the two wheels. More on that later...

The hubs/drums look decent. Just need a cleaning...

When we towed it home I noticed a scraping noise in the wheels. I thought maybe the brakes were too tight or something. No. I pulled off the drums and found the brake tension adjuster (?) and spring were riding free inside the hubs. This was actually on both sides. I don't know if they had just adjusted them all the way out (to free up the brakes) and that caused them to come off? I don't know. I honestly don't know much about brakes. I will have to fix it if we plan to use the brake system...

I am also ordering new bearings, races, and seals which normally wouldn't be horrible but some of the numbers on the parts I have don't match up to some of the parts like eTrailer.com. Trying to figure out if I can get all the parts from just one place. Frustrating.

Another frustration is the fact that I can't seem to get 1/8 birch plywood anywhere in the Madison, WI area. Everyplace tells me they have to order it but the supplier is out of stock. One place in McFarland told me they could have 4'X8' sheets by the end of next week. Then I get the call today that he was wrong and I can't get it until June. WTF?!? I called 5 places the day I ordered. Looks like I have to make more calls to track this stuff down. I really didn't think it was going to be this hard. I really need it to have it on hand when I reach this part of the restoration. That won't be June. Again... frustrating.

Back to the resto...
I started sanding down the frame and coupler area to get it ready for primer and paint...

I started doing the bumper also. There was 3 or four layers of paint on both the coupler and bumper. I had to do paint stripper twice...

Then I realized that the skin was getting in my way. I was going to pull this anyway so it isn't the biggest deal to do this. Here it is pulled. I see the street side corner had a nasty leak and there is quite of rot on that side. You can see the first coat of primer on the coupler also...

One of my side projects was to clean up the door trim. On some parts there was a thick layer of gritty oxidation. I quickly wets anded the parts with 600 grit to get rid of most of the grit. Then I shined it up a bit with the Mother's Polish by hand. Here is the shot of the main door hinge...

I also pulled the fridge vent access door. This was REALLY oxidized on the inside. I'm not sure if this was from hot exhaust air from the refrigerator or what? It took me a while to cut through the scale. It didn't turn out to bad...

Another side project is to figure out the door lock situation. We had a broken outside handle on our trailer. One of the VSTF members named "Flyingham" donated a outside lock assembly so I could fix what I have. I also ran across and bid on a  L-66 on eBay. I think I ended up getting a decent deal on it. The auction ended and I was surprised I had won. So here is the lineup. The top one is the donated half from Ham. Next is our original lock. Other than the broken handle, I never really though this looked that bad. Wow. Put it next to the  eBay lock and it looks like crap...

Here is the locks taken apart and given a vinegar bath to remove rust on some of the pieces...

All of the parts out of the pool, cleaned up with steel wool. I should be able to make at least one really decent lock out of all these parts...

But... I haven't done it yet. So many things...so little time. I have more info but I'm tired so I will save it for later...

Stay tuned for more.

Tuesday, April 19, 2011

A Little Bit Of Everything...

Ahhh... Where do I begin?

There has been a lot of things in progress but nothing completed. Just a bunch of started projects. I thought I would dump a bit here as to not get too far behind on the blog. Lets get to it...

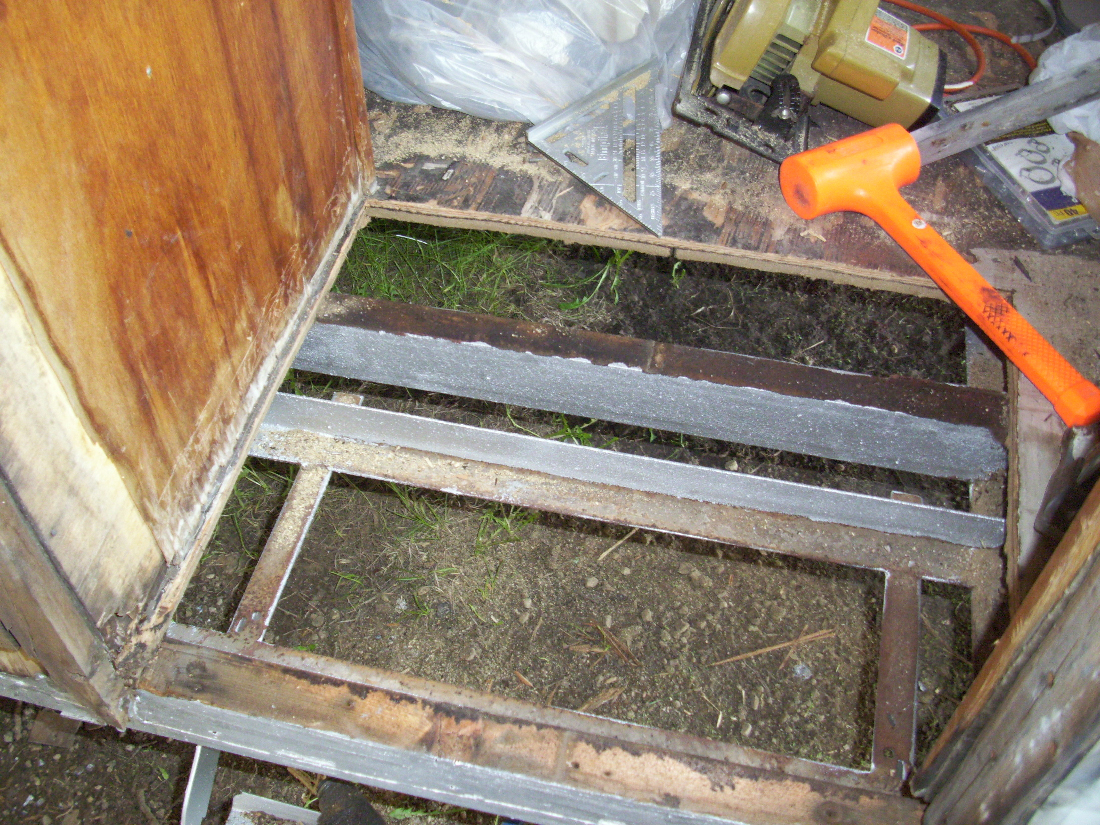
Late last year I started to strip the floor of the original tiles that were covered with cheap linoleum. This project has been a pain. Of course it was stopped shortly before putting up the shelter and never picked back up because the weather quickly went to crap Wisconsin weather mode. I did find some rot near the main door when I removed the flooring. I also removed the front dinette benches and realized that the dinette structure was holding the wall near the door in place. Now that the bench structure is gone the wall moves freely. This means there is considerably more rot in the wall that will have to be addressed later. Here is the damage to the plywood floor and the wood directly under the threshold...

You can also see in that picture that there is no door trim. Now that the trailer is under wraps I can freely open it up. I pulled off the door, the door trim, and the drip cap above the door. Now that the trim and drip cap were removed I was able to look closer at the crack in the aluminum above the door. I found two other cracks that were hidden by the door trim...
I of course will have to address these also. The list grows longer...

Now with the door off the hinges I am able to really look at better. Here is the patient on the operating table...
The PO said that they "rebuilt" the door at one point. Well, given how much water was apparently running down the door I was expecting very bad things. I pulled the Bargman L-66 lock and drilled out the hasp. I HATE hasps. This is getting replaced with a deadbolt. Cleaning up the holes left by the rivets is going to take a bit of creative work. Anyway, I bit the bullet and cracked it open...
Just as I expected. The bottom is completely gone. I took apart the entire thing to clean the parts and build a new frame...
Mud Daubers were living in other parts of the trailer but apparently they were also subletting to some wasps...
I need to get my hands on some lumber and insulation to rebuild the door...someday soon.

I started cleaning up the door trim. There was quite a bit of oxidation on these pieces so they needed to be dealt with. I did a quick wet sand with 600 grit paper. Cleaned up the residue from the sanding with some mineral spirits and started to polish. I wanted to knock this out quickly so I opted to do this by hand with Mothers Polish. I don't care if it shines like a mirror and the thin aluminum dictated the hand polish. The bench buffer doesn't do that well with that thin stock. It's too aggressive. Here is the aluminum door trim cleaned up a bit...
It doesn't look too bad but you can see in this picture that the trim has been pretty abused over the years...
It is what it is. It won't be perfect and the polish brings out the defects. With the oxidation removed it does extend the life of the piece which is a good thing.

Next. I removed the front corner fixed windows. I told you this was a little bit of everything. I really don't have any progress pictures of this. The windows were REALLY chock full of silicone. These windows are notorious for leaking. I guess the PO combated this with applications of silicone. There were some very hard clumps that tell me they did this more than once. These windows really are a poor design. Here are one of the problems with these things. You can see that over the years the Heer Standard Glass Seal has shrunk. The PO pumped silicone in there to attempt to fix the problem...
I also started to remove the rear bed so I could continue to remove the flooring. No pictures of that. I did run into a snag when trying to remove the nightstand. It was secured from the outside before the skin was applied.  Time to remove the panel. The screws holding on the drip rail were horribly rusted so it made the process incredibly slow. After struggling with screw after screw you sit and see this...
A long line of screws ready to give you a headache. Finally I was able to power though and remove the rear panel...
I started removing the rock wool to get a better idea of what damage that stupid AC unit had done. Here is some of the worst...
The cross brace was so brittle and rotted it crumbled in my hand. This cross piece must have collected the water that was shedding down the back of the trailer and spread it across the plywood panel under it. As you can see in this photo the panel is completely gone directly under that point...
I removed the two panels right above in the last photo. I was able to see that at one point the street side of the trailer had a leak in the corner. This is indicated by the color and the delamination of the plywood strip. It isn't the worst I have seen out there but it's never a welcome site...
The curb side edge looks a lot better...
You can see that it isn't dark colored and the nails have little rust on them. I hope I find more in good shape like this but I'm guessing no.

Sooo... That is a little bit of everything.

Stay tuned for more...