Monday, November 21, 2011

Wednesday, November 16, 2011

STOLEN...Do NOT Buy...


PLEASE... No one buy this calendar or anything from this person! 

This person used my VSTF logo from the forum WITHOUT my permission to make and sell calendars on her Etsy site. 

I have contacted the seller requesting that they take the item down immediately... BUT I'm kinda pissed that I have to tell someone NOT to use my images to make money. Please pass this along to other trailer folks.

Saturday, June 18, 2011

Trailers Of The VSTF...


On the Vintage Shasta Trailer Forum I asked members to submit their trailer photos for a video project.


I have gotten the first two videos done. I have actually never done a video on the internet. I think with the meager software that I have the videos are the best I can do. I haven't ever edited a video before but I think they turned out well. 


I hope to do more videos if folks enjoy them and I will get more member submissions in the future. Enjoy...


Trailers Of The VSTF...


Trailers Of The VSTF 2...

Wednesday, June 15, 2011

Insert Witty Title Here...

Been busy today. Lets get to it...

First I put a self-leveling floor patch on the scrapped floor. There were plenty of divots that  This will help once the underlayment is laid down...


I went on with the exterior. I put some attention to the roof. Here is the black water tank vent cap...
You can see the PO put a thick layer of roofing tar on the vents. I managed to scrape most of the tar away and remove the cap so I can clean it up and reseal it properly...

Apparently, I have never took a shot of the roof vent before I took it out. I can assure you it was covered with the same thick roofing tar. Here is the hole with the skin cleaned up to get ready for the Fantastic Fan...
If you have this on your roof you can use a heat gun and warm the tar then scrape it off with a putty knife. Once you get it all off you can go back and clean the skin with Goof Off and a cloth. It dissolves the residue well. 

I went back inside and removed the upper kitchen cabinets so could remove the damaged ceiling panel completely...
I pulled the panel completely and re framed the ceiling area. If the skin and frame looks a bit separated its because I shimmed the vent area so water will run away from the vent...
And test fit the Fantastic Fan...
And insulated the area...
Ignore the sloppy tape job. I was getting tired and wasn't in the mood anymore.

More to come. Stay tuned...

Tuesday, June 14, 2011

Moving Right Along...

This post isn't as timely as it should be. I have been doing work that takes a bunch of time but it is what it is. You can't rush some things.  Lets get to it...

I managed to get all of the insulation in all of the walls. It is such a slow process just because each panel is a different size. I think all of this will help. Here is the curbside...
The rear...
The blue paint is left over exterior paint from another project that I applied to all of the new framing to help keep water from soaking in if it does get behind the skin. It isn't bulletproof but it is better than nothing at all. The street side from the rear...
The street side from the front...
I have managed to stuff it in every nook and cranny that I could. I wish I could get every area but most areas aren't accessible doing the type of restoration we are doing.

Moving on. I put the final coat on the A Frame and coupler area. I talked about it a little bit in this post but I should explain the process a bit more. I used chemical stripper on the old paint. Scraping as much paint as I could off of the areas. Then I used a wire wheel and a flap disk to remove the rust and remaining paint. I primed with same Rustoleum that I used on the entire frame. I then used Rustoleum Professional in the aluminum color. I ran out of that paint so I finished it off with Rustoleum Silver Metallic in rattle cans. I think it looks a ton better than it did originally...  
Here is the before and after...
I also did the same thing on the bumper. Here is the final coat...
And the before and after...
This bumper needs to replaced but that may come farther down the road. The rust removal and paint will help    keep it serviceable for a while longer.

I also FINALLY got the floor tiles and linoleum scraped off. That project seemed to take entirely too long. I don't know if I have mentioned it before but you really have the right tool for that. I started with my Dremel Multi-Max and the rigid scraper. It tool took WAY too long. It would work if you had a tiny section to remove but it isn't the right tool. I bought a heavy duty floor scraper with replaceable blades. Like this one..
It works so much better because it really is the right tool for the job. Those tiles seemed to fail after all this time but that glue or mastic or whatever it is that they used to adhere to tiles is a bear to scrape up. Wear your mask and all of that good stuff too. They say that the tiles contain asbestos. I wore my respirator because I am sure those little disposable ones won't do the trick. Here is the work done...
Another shot...

I cut and fit the new closet panel also...

I pulled the ceiling panel to start work on that area...

I should have new stuff soon. I have written out my to-do list. I won't bore you with it but it is really long when you write it out like that. It does motivate me to push on. Stay tuned for more...

Wednesday, June 1, 2011

A Bit More Progress...

It has been awhile since my last post but I have been working a few hours here and there. Here is what has happened since my last post...

The door got put back together and sealed. Here I had taped off the "Z" stripe for polish...

I used the felt buff chucked in my drill and some brown compound to give it a good shine..

I then taped off the stripe and primed the door...
It is now set aside waiting for paint.
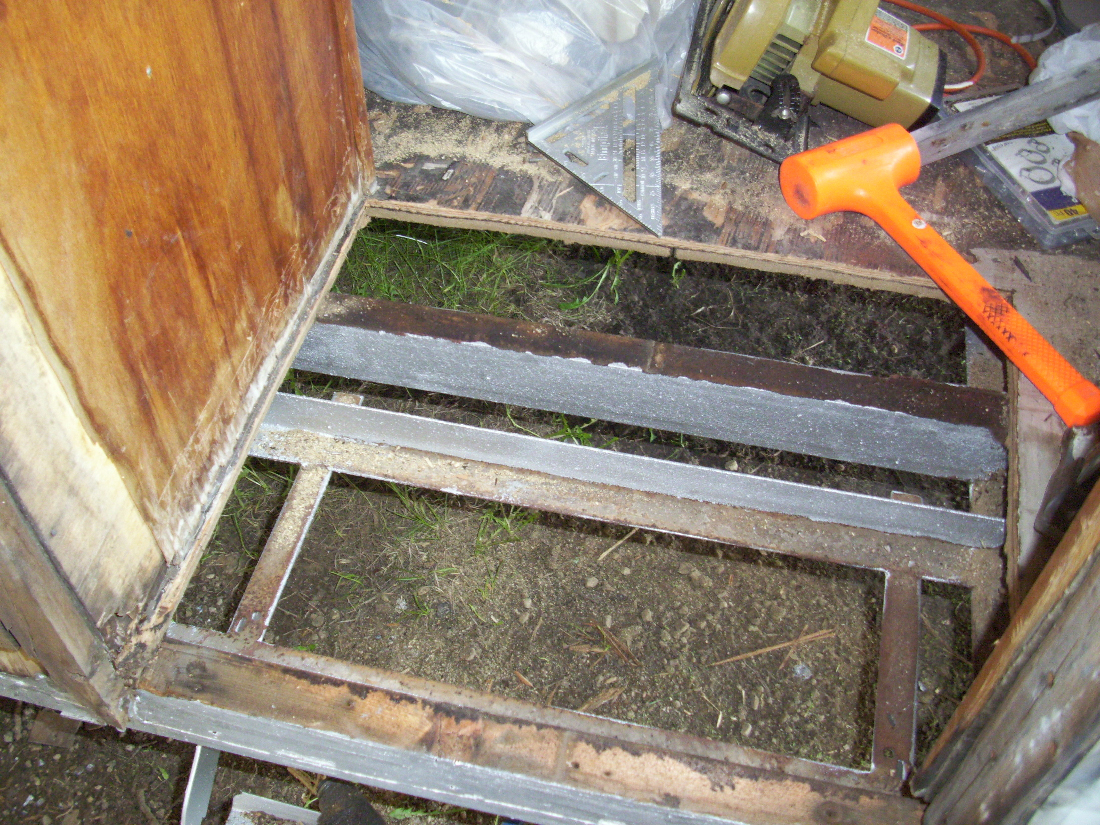
I removed the section of the floor where the leaky door had started to rot and delaminate the floor...

Let me apologize for the crummy pictures. I swear this camera is getting worse and worse. Here is the new section of floor installed...

You might have noticed that the closet panel was also removed. I didn't want to take this out but it is just too far gone..

I have been hunting for rot and trying to find it and remove it. Here is some more rot that must have come from a leaky black water tank vent cap...

I have also been tackling replacing the framing. I removed all of the rotted framing and tried to make the new framing more substantial. Here is the curbside done up to the door...

A before and after of the baggage door framing...

Again, sorry about these crappy pictures. Here is the curbside wheel well framing...

Here is the street side framing done all the way up to the front...

Once I was done with each side framing I went to the back to finish that up. I had bought a Hehr Standard window for the rear window which was gone. I had never really fit the window in the hole to because we had the rear window sealed up with plastic since we bought the trailer. It had always been in the back of my mind. Really because I wanted to see if the PO had altered the opening to fit the AC unit in the window opening. I didn't think that the actual replacement window wouldn't fit. Talk about a oh $#!@ moment. I study a lot about Shastas but even I didn't know (or even think) about the fact that an Airflyte would have a larger window than a 16 SC. Luckily, I discovered this at this point in the work. I just needed to make the opening larger to accommodate the bigger window. I removed all of the rear cross members to start fresh...

I redid all of the rear framing which was going to get redone anyway...

Going back to a few previously discussed items...

Here is a horrible shot of the grinding, priming and painting I did on the entire frame...
 I also did the wheel wells which probably benefited more from this. They are on the verge of rusting away. I think the rust removal and paint will keep them serviceable for a while. All of this sort of thing is really easier when you do a complete frame off but that wasn't in the cards this go around. I had to make due with the options I have. It was a lot of work to spend that much time under the trailer but I feel better knowing I have done what I can to make sure it isn't rusting away.

I also got the new tires mounted on the rims...
Again. These will probably end up another color but I can do that later. I am still hunting for a good buy on vintage 15" caps. I have really been eyeing up early 50's Oldsmobile caps. I like the design they had. Then again I keep seeing other caps on ebay that I like also. Maybe at some point I can have more than one set of caps and could change them out to suit whatever mood we are in.

I am sure I will have more updates soon. Stay tuned...

Wednesday, May 18, 2011

Another Late Night Post...

Lets get right to it...

I got my hubs finished finally. I removed the races because one was nicked and I thought it would be best to just redo both sides. It cost more than I had planned but it is peace of mind. After removing the races I took a flap disk and wire wheel  to the hubs. They were looking rough. Here they are after the rust removal...
I primed and painted them with Rustoleum Professional Aluminum paint that I have been using for the frame and other parts. The paint won't last for ever but what the heck. It will stop them from rusting into oblivion. I installed the new races, packed the bearings, installed the grease seals and mounted the hubs. I will try to post the numbers and sources of the races, bearings, and seals at some point. This might help someone I guess. Here is my favorite picture...before and after...
I received my grease seals and outer bearings and races in the mail just yesterday. Unfortunately, the bearing supplier didn't ship me two sets like I ordered so I was only able to assemble and mount one side.

I also stripped and wire wheeled the three wheels. I primed and painted them with Rustoleum Metallic Silver. That is what I had on hand from other projects...
They don't look to bad. I think they will get repainted at some point. Probably the Cloudburst color we have picked for the body of the trailer. It may not matter too much as I plan on running full caps. I am still looking for some vintage caps that won't kill me budget wise. We are now $268 over budget so finding nice but affordable caps are is a challenge.

I also have been banging out the entrance door stuff. I assembled the Bargman L-66. If you are taking your lock apart remember to grease the parts. I put it 80% together before I realized I hadn't greased anything. I don't think it looks that bad...

I still think these things are junk. I don't like them at all especially for the money they command. If you are repairing and cleaning your lock here is the exploded view to help you out...

I finally finished the interior door panel. It didn't go that smooth. I did two coats with the shellac thinned with denatured alcohol on the advice of a VSTF member. It was looking a little on the light side color wise and I got cocky and applied the third coat full strength. That did not go well. I had to sand all of the finish off and start over. IT SUCKED! I did it all again but stuck with the thinned shellac this time. I think it looks pretty good... 

You can see that I have dry fit the door lock. It took a ton of working on this. My "guide plate" broke in my hands so I had to fabricate a fix. Did I mention these locks suck? Here is the plate I had to make...
It seems to work. I spent WAY too much time making it and making it fit.

I got rid of the stupid hasp the PO put on and got us a RV door lock from VTS. Here is the dry fit of the deadbolt. I think it seems to work pretty well and looks a lot better than a hasp...
Sorry the picture is crappy. It was getting late. I stopped there because the shelter is about 15 feet from the neighbors bedroom window and I don't want to be a crappy neighbor and be hammering and drilling at 10 at night. Stay tuned for more...

Sunday, May 15, 2011

Today's Progress...

I spent a little time today at my second home...Menards. More money out the window. Today was VERY windy so I didn't get any painting done. Again. The wind was violent and consistent all day. Makes working in a shelter that once blew down very interesting. It seems that the new anchors are doing their job...

Today I got to work on the door. I rebuilt the frame and got it insulated. Sorry, no progress shots. Just the end result...
This is heavier than the original frame but it will eliminate the flex that the original frame had.

I cut the interior skin and got one coat of Bulls Eye Shellac on...

 So far it looks pretty good. I got to few more coats with sanding in between. Hope to get this door done soon.

That is all for now. Only so much you can get done in a day. Stay tuned for more.

Saturday, May 14, 2011

Rain Rain Go Away...

Today was a horrible day weather wise. I really want to get the frame painted and a coat on the wheels but today was not a great day for that. Too windy, rainy and cold. Not painting weather. Tomorrow looks to be more of the same. Blah.

I tried to keep busy doing other things...

I wet sanded down the inside fridge vent panel. Here it is in progress...
You can see the scale on the left and the sanded on the right. I hate aluminum oxidation about as much as I hate rust.

Here is the LAST of our drip caps shined up. The last one being the door cap was knocked out today. I am very happy these are done. That is enough of doing those stupid things...

With the crappy weather I thought I would take some time to clean up the drip rails that I pulled off when I removed the lower skins. Here are the four I wire wheeled today...
There was a bunch of butyl tape both sticky and dry stuck on the back. The PO did a thick bead of silicone to seal the rails which also had to be removed. All of this will help later to make good seals when the time comes to put them back on. I gotta shoot some self etching primer on these. Maybe when the wind dies down.

I went to town on the wheel well trim with the wire wheel. These were loosing most of their paint and had very thick rust spots from the steel screws holding them on. There is a bit of electrolysis around the screw holes but nothing major. Before in the back and after in the front...
 Here is another shot...

Nothing that will blow your skirt up in this post but I gotta stay on top of this stuff. Just trying to keep this current so I don't have to back track too much. I have a few more days left on my vacation so I am racing to get the most I can done before I go back to work. Stay tuned...