Tuesday, April 24, 2012

It's Been SOOOO Long... Part 2

I guess it is hard to know what to show next. But I will try to keep it in chronological order. Here we go...

- After installing the paneling and rebuilding the dinette platform cabinets, the rear goncho, and the nightstand... I sanded EVERYTHING. I do mean everything. That was quite a project in itself. There are so many surfaces that had old shellac that needed the finished knocked off to get ready for new shellac. I think I did around 4 or 5 applications of Bullseye Amber Shellac. Again. I don't have any progress pics of this. I apologize. The new finish is darker which isn't a bad thing. It does look much darker in the all of the pictures than in person....


-I remounted all the cabinet doors and drawers. I bought brand new chrome hinges. The old ones were not in the best of shape. The new ones while not seen as a big deal make a big difference. I am glad I made that purchase. I think I may have mentioned before that I got new drawer pulls as a Christmas gift. They are the boomerang pulls from Rejuvenation. Those pulls are a perfect reproduction of the kind Shasta used in their trailers. Unfortunately our pulls had been replaced at some point. I didn't really cry much about that because I knew Rejuvenation had the right pulls to replace our cheapo box store pulls. Here are the new pulls. I think they look great...


-Here is a finished Shasta magazine rack mounted. Not much to say. You saw the progress pics in the last post...


-I also had redone the sconces. They were brass but painted with gold paint. I stripped the paint and painted them with Duplicolor chrome. I don't mind brass in some applications but with all of the aluminum trim on the cabinetry the brass didn't make much sence at all. Here is one of them without the shade...
I really didn't take great pictures of them before or even after but here is one now redone and mounted along with the reconstructed and refinished Shasta magazine rack...

Here is one in the rear above the goucho...


- I gave some attention to the stove which wasn't in the best shape. I refinished all of the surfaces the best I could. The chrome trim was rusted and pitted. I tried to shine that the best I could. I just went with a brushed finish. The burners and grates were very rusted. I knocked off the rust and painted them with high heat barbecue black. Finally cleaned the inside the best I could but it wasn't that bad inside...


-I also tackled the formica. It is isn't actually Formica brand it is Pionite. Pionite Surfin' USA to be specific. I made all new sliding doors for the upper cabinets...

And the goucho sliders...


-We liked the original laminate but it was not in good shape. Burn marks, scratches, and dull spots weren't really doing it for us. We decided to replace it. I did the back splash in the same laminate. One thing that was never a feature in the original trailers. For some reason Shasta used white back splashes with plastic trim which I never cared for. I also extended the back splash up to the window. I just think it looks better that way. I also made new aluminum trim for the laminate. The original trim on the lip was redone and is still there. I just added to it. I think the additional trim aluminum looks good...


The fridge bump out...

I added an outlet to the fridge bump out. I think it will come in handy...
The sink of course...


- I also made new aluminum trim for the rear window because that was missing. I also made trim for the kitchen window because for some reason Shasta did that one window with wood trim. Aluminum looks better...


-Just of couple of more because I like the way this looks...


I think that is about it for now. I hope to make some more progress in the next couple of days. Stay tuned...


It's Been SOOOO Long... Part 1

It has been a long time since I have posted! June was a long time ago. Shortly after that last post it got HOT. I am sure everyone remembers how hot it got last summer. The shelter I work in is quite nice in bad weather but it holds heat like crazy. Probably 10 to 15 degrees hotter than the outside temperature. That's nice when it is 60 degrees. Not when it is up into the 90's. That put things on hold awhile.

After that our digital camera took a dump. Once the heat let up, I went back to work but the lack of a camera put the blog on the back burner. We got a new camera so it is back to updates. There is a bit of a backlog to cover so bear with me. Most of the things are now in a completed stage (or very close to with only minor things to do). For instance I don't have pictures of the cabinets and paneling in the raw right after construction. I only have them as they stand now with the new finish on them. Up to this point I have been trying to do in progress pictures but with no camera handy I just motored on. I apologize for that...

-I replaced all of the birch paneling that I had removed to get rid of the rot. I don't have any progress shots of any of this because of the digital camera issue but you can see which ones were replaced if you go back through the blog. I had a lot of the panels from when I tore them out so that wasn't real bad to get the new panels to fit. It takes some tweaking but it isn't real bad. The hard part was doing the trim work. I made a lot of the new trim myself trying to match the old stuff as best as I could. That coupled with some weird angles and contours made creating and installing the new trim pretty hard and time consuming all through the trailer...


-I rebuilt both platform cabinets for dinette. I used the face frames and put all new lumber supports to make it more sturdy and fit better.

The street side with the drawer...


Curbside with the slide drawer. The plywood you see is new with the original face frame. The original plywood was destroyed from a leak from the door area... 
You can see that it didn't look that bad but when I started to take it apart it showed how bad the rot was in the area near the door. I also ditched that outlet...


Kept this outlet though. Replaced the outlet with a new brown one and a nice new chrome cover...


-I also rebuilt the back goucho platform also. Same deal. I used the original face frame and built new supports to make it a bit sturdier.


-Along with the goucho I rebuilt the tunnel and the nightstand. This area was toast. It was barely holding itself together. The doomed window AC unit created the moisture and dripping water that made this area delaminating mush. I could just pull the plywood of the tunnel off with my hands. That's not good...
As you can see I added a new angled aluminum strip to protect the edge of the tunnel. I figured that edge has potential to see some wear and tear. The plywood edges would be prone to chip out. This will help keep it nice...
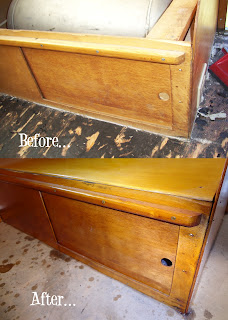
Pretty much the only original part of the nightstand is the face frame. I rebuilt the whole thing. I also added the new laminate to replace the original top laminate. I thought it could benefit from the other two shelves getting the new laminate and aluminum trim also. I'll cover more on the formica later...

-I did some cabinet reconstruction and rehab to the rest of the kitchenette. The main bank wasn't too bad of shape. I did reskin the two upper cabinets that I had removed (you can see that here) because they were dry rotting and chipping like crazy. I don't really have any progress pictures of that process. Sorry.
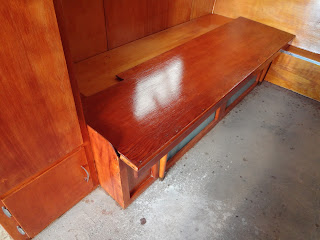
Because the roof vent leaked quite a bit at one point there were some problems it caused. The water fell and hit the floor splashing up onto one of the doors. Or at least that is my theory because the door at the bottom of the kitchenette was delaminating and not in good shape. In had to remake this door with new plywood. Here is the new unfinished door behind the old nasty one. Sorry about the crap picture...


-I also did a bit of work on the magazine rack. It also was in rough shape. The face was delaminating as you can see in the picture below. I remade this with new plywood. Again, sorry about the crappy pictures...


I have a lot more to share but I will throw this part of the story up. The rest will be right on it's heels. Stay tuned for more...