Friday, May 13, 2011

Work...Color...Work...Patterns...Work...

Haven't had a blog post for a while.

I have been working hard on the trailer. Not much to show at the moment which is a bit frustrating. A few projects have been going on all at the same time. I have sanded, primed and started painting the trailer's frame from front to back. I have also wire wheeled the steel wheels and put on the first coat of primer. Sorry no pictures. I will cover that later.

I have also been busy buying parts and material left and right. We are hemorrhaging money. So much so that we are now $115 over budget. The sad part is we still have stuff to buy. Not good. Not good at all. It will all be worth it in the long run. Right? Anyone want to buy a kidney?

Because I don't actually have any projects completed I thought I would share the new interior scheme. Our laminate has seen better days we thought we would go with some new stuff. This spurred the whole change in the interior design. Here is the lineup...

First up: Paint. We picked Sherwin Williams Industrial paint for the exterior. "A" is a off white called "Marshmallow". The bottom color will be the "B" which is known as "Cloudburst".

"C" is our Pionite laminate called "Surfin USA".

"D" and "E" is marine vinyl for the seating made by Morbern.

"F" is our curtain material the "Daddy-O" in butter cream.

"G" is our flooring choice from Armstrong also known as "Butter Cream".

Lastly "H" is our awning from Marti is the Sunbrella pattern called "Easton Lagoon".

First I will say that the picture really doesn't represent the colors very well. They look much better and closer together in person. Just trust me on that. Yeah this is sort of a bush league post but I don't much to show for as much work as I have done lately. So... back to work.

Email me if you are interested in that kidney.

Sunday, May 1, 2011

Jefferson Swap...

I realized 20 minutes into owning this trailer that we would defiantly need a spare tire for this trailer. The problem is there wasn't one with the trailer. Hence the crap we had to deal with when we had our first blow out. I wanted to keep the style of steel wheel like it had originally. I realized that after getting the tires removed from the wheels that one was original to the trailer and one was a replacement. My local shop said I should look for the newer version to match the replacement and use the original for a spare. Where would I find a used steel 15" wheel with a 5 on 4 1/2" bolt pattern and a 3 3/4 backspace? Good question. Jefferson Swap Meet maybe?

I haven't been to Jefferson Swap Meet in quite awhile. Usually the weather sucks when we have gone in the past. This year it was pretty nice and warm. My Dad went with me on the mission to find the rim and a set of hubcaps. Only about 3 or 4 rows in I saw a vendor just setting up set the sea foam green wheel down in front of me. I grabbed my tape measure and everything looked good. $20 dollars was all the vendor wanted. Not a bad deal. Here is the "new" sea foam green wheel on the right with our other two...


I need to find someone to media blast this things so I can paint them up. Something like powder coat would be the best option for a finish but that is at a minimum over $100. Too pricy for our budget. I will have to stick with paint.

There were actually a few vintage trailers that vendors where using at the show. I ran into a kind old man (If I remember right he said he was in his 80's) and his son that had a 1963 Shasta 16 SC that he had owned for a few years. He gave me a tour and we talked a bit about his trailer. It was in the typical shape for a Shasta of that age. Water damage and that sort of thing. It was pretty much all original. One thing that was different was that he had the front gaucho instead of the more typical dinette. He did add more modern 12v lights in a few spots inside. The only big downside is that he had cut the wheel wells larger so he could fit a different size wheel and tire on it. It wasn't the best feature on a trailer this age but it could be fixed by someone with skill. The SC had the optional heater in it and stated that is why he bought the trailer. He said he sold the canvas bunk that was almost brand new and sold off the Shasta script badge. My Dad popped the question if it had wings when he bought it. "Yeah, I sold those for scrap a few years ago" he said. Dad and I let out a groan and I told him that those things go for around $200 now a days. He tried to keep a poker face when he asked if that was the case. You could tell he was rethinking that decision again.

He also mentioned a story about the trailer having a spare tire carrier on the back and loosing that on a trip and not realizing it until he got home. That must have been interesting for someone following him. He said that he may be leaving the parts business soon and would no longer have a need for the Shasta. I gave him some contact info and told him if he wanted to sell it that I could probably find a buyer for him. Not sure what he would want to sell it for but I might be a decent deal for someone.

Ultimately I did not find any hubcaps. There were plenty to choose from at the swap. The problem is that they are usually branded by the car manufacturer. I am looking for something more generic. My choices were to do a full size generic cap or find some baby moons and maybe do a beauty ring also. I found a vendor selling new made baby moon caps that fit the Ford style rims but they suck. The new caps are made in Taiwan and not what I would say a quality product. They are very thin and the chrome seems thin also. The vendor was selling them in sets of 4. First off I don't need a full set for $65 bucks. At the most I need 3. The cap on the top of the stack was nice and shiny. If you picked it up and turned it over it had rust on it already. The next one on the stack had small scratches in the chrome and more rust. The third had a tiny dent in the face. That was all I needed to see. $65 bucks for brand new scratched rusty caps? I don't think so. I think most vendors online sell the same thin crappy caps. Of course there was a guy at the swap selling full 15" Moon style caps but when I decided to go back to see if he still had them they were gone. So the hunt is still on for some hubcaps of decent quality.

Sorry for the lack of pictures in this post but there isn't much to show. Maybe more next week...

Saturday, April 30, 2011

More Work. Nothing Done...

Here we are again. I have done a ton of work on the trailer lately but nothing really done. I really want to keep up on the blog regardless. If I fall too far behind it takes forever to update this thing. Resizing pictures, uploading pics, writing stupid and poorly written comments... It all takes time. Enough complaining. Let's get to it then...

Where to start? I removed the curbside rear skin to see the horror. And really it wasn't that bad. I was surprised...

The back lower corner has a bit of rot. Nothing horrible or nothing that can't be fixed...

There is some more rot in the wheel well area...
All of this is getting replaced of course.

I removed the wheels and had the tires removed from the rims at a local shop so I could pay the rims some attention. As you can see from the picture above it is still wearing the Chrysler caps the PO had put on it. One was destroyed when it went flying off on the highway during the initial recovery. I had assumed that both wheels were the same. Not so. One was a older rim and one a slightly newer replacement according to my local shop. I don't know why but I didn't care. I needed to find a spare so maybe I could find a match to one of the two wheels. More on that later...

The hubs/drums look decent. Just need a cleaning...

When we towed it home I noticed a scraping noise in the wheels. I thought maybe the brakes were too tight or something. No. I pulled off the drums and found the brake tension adjuster (?) and spring were riding free inside the hubs. This was actually on both sides. I don't know if they had just adjusted them all the way out (to free up the brakes) and that caused them to come off? I don't know. I honestly don't know much about brakes. I will have to fix it if we plan to use the brake system...

I am also ordering new bearings, races, and seals which normally wouldn't be horrible but some of the numbers on the parts I have don't match up to some of the parts like eTrailer.com. Trying to figure out if I can get all the parts from just one place. Frustrating.

Another frustration is the fact that I can't seem to get 1/8 birch plywood anywhere in the Madison, WI area. Everyplace tells me they have to order it but the supplier is out of stock. One place in McFarland told me they could have 4'X8' sheets by the end of next week. Then I get the call today that he was wrong and I can't get it until June. WTF?!? I called 5 places the day I ordered. Looks like I have to make more calls to track this stuff down. I really didn't think it was going to be this hard. I really need it to have it on hand when I reach this part of the restoration. That won't be June. Again... frustrating.

Back to the resto...
I started sanding down the frame and coupler area to get it ready for primer and paint...

I started doing the bumper also. There was 3 or four layers of paint on both the coupler and bumper. I had to do paint stripper twice...

Then I realized that the skin was getting in my way. I was going to pull this anyway so it isn't the biggest deal to do this. Here it is pulled. I see the street side corner had a nasty leak and there is quite of rot on that side. You can see the first coat of primer on the coupler also...

One of my side projects was to clean up the door trim. On some parts there was a thick layer of gritty oxidation. I quickly wets anded the parts with 600 grit to get rid of most of the grit. Then I shined it up a bit with the Mother's Polish by hand. Here is the shot of the main door hinge...

I also pulled the fridge vent access door. This was REALLY oxidized on the inside. I'm not sure if this was from hot exhaust air from the refrigerator or what? It took me a while to cut through the scale. It didn't turn out to bad...

Another side project is to figure out the door lock situation. We had a broken outside handle on our trailer. One of the VSTF members named "Flyingham" donated a outside lock assembly so I could fix what I have. I also ran across and bid on a  L-66 on eBay. I think I ended up getting a decent deal on it. The auction ended and I was surprised I had won. So here is the lineup. The top one is the donated half from Ham. Next is our original lock. Other than the broken handle, I never really though this looked that bad. Wow. Put it next to the  eBay lock and it looks like crap...

Here is the locks taken apart and given a vinegar bath to remove rust on some of the pieces...

All of the parts out of the pool, cleaned up with steel wool. I should be able to make at least one really decent lock out of all these parts...

But... I haven't done it yet. So many things...so little time. I have more info but I'm tired so I will save it for later...

Stay tuned for more.

Wednesday, April 20, 2011

I Win...

I win. I have finally defeated what was quickly becoming my nemesis. The front window. What a pain that was. A ton of parts to sand and polish. All of these parts start to look alike and confusion sets in. Rivets that were set, drilled out, and reset because of not paying attention. A lot of time was put into this beast. I do want to thank Molly for her help with setting the rivets.

It can be done. You can redo these things but you must be armed with determination, patience, and a whole arsenal of cuss words. Sorry for the crummy pictures in our dark basement but here it is...
Back to my real job for a bit...Stay tuned for more.
 

Tuesday, April 19, 2011

A Little Bit Of Everything...

Ahhh... Where do I begin?

There has been a lot of things in progress but nothing completed. Just a bunch of started projects. I thought I would dump a bit here as to not get too far behind on the blog. Lets get to it...

Late last year I started to strip the floor of the original tiles that were covered with cheap linoleum. This project has been a pain. Of course it was stopped shortly before putting up the shelter and never picked back up because the weather quickly went to crap Wisconsin weather mode. I did find some rot near the main door when I removed the flooring. I also removed the front dinette benches and realized that the dinette structure was holding the wall near the door in place. Now that the bench structure is gone the wall moves freely. This means there is considerably more rot in the wall that will have to be addressed later. Here is the damage to the plywood floor and the wood directly under the threshold...

You can also see in that picture that there is no door trim. Now that the trailer is under wraps I can freely open it up. I pulled off the door, the door trim, and the drip cap above the door. Now that the trim and drip cap were removed I was able to look closer at the crack in the aluminum above the door. I found two other cracks that were hidden by the door trim...
I of course will have to address these also. The list grows longer...

Now with the door off the hinges I am able to really look at better. Here is the patient on the operating table...
The PO said that they "rebuilt" the door at one point. Well, given how much water was apparently running down the door I was expecting very bad things. I pulled the Bargman L-66 lock and drilled out the hasp. I HATE hasps. This is getting replaced with a deadbolt. Cleaning up the holes left by the rivets is going to take a bit of creative work. Anyway, I bit the bullet and cracked it open...
Just as I expected. The bottom is completely gone. I took apart the entire thing to clean the parts and build a new frame...
Mud Daubers were living in other parts of the trailer but apparently they were also subletting to some wasps...
I need to get my hands on some lumber and insulation to rebuild the door...someday soon.

I started cleaning up the door trim. There was quite a bit of oxidation on these pieces so they needed to be dealt with. I did a quick wet sand with 600 grit paper. Cleaned up the residue from the sanding with some mineral spirits and started to polish. I wanted to knock this out quickly so I opted to do this by hand with Mothers Polish. I don't care if it shines like a mirror and the thin aluminum dictated the hand polish. The bench buffer doesn't do that well with that thin stock. It's too aggressive. Here is the aluminum door trim cleaned up a bit...
It doesn't look too bad but you can see in this picture that the trim has been pretty abused over the years...
It is what it is. It won't be perfect and the polish brings out the defects. With the oxidation removed it does extend the life of the piece which is a good thing.

Next. I removed the front corner fixed windows. I told you this was a little bit of everything. I really don't have any progress pictures of this. The windows were REALLY chock full of silicone. These windows are notorious for leaking. I guess the PO combated this with applications of silicone. There were some very hard clumps that tell me they did this more than once. These windows really are a poor design. Here are one of the problems with these things. You can see that over the years the Heer Standard Glass Seal has shrunk. The PO pumped silicone in there to attempt to fix the problem...
I also started to remove the rear bed so I could continue to remove the flooring. No pictures of that. I did run into a snag when trying to remove the nightstand. It was secured from the outside before the skin was applied.  Time to remove the panel. The screws holding on the drip rail were horribly rusted so it made the process incredibly slow. After struggling with screw after screw you sit and see this...
A long line of screws ready to give you a headache. Finally I was able to power though and remove the rear panel...
I started removing the rock wool to get a better idea of what damage that stupid AC unit had done. Here is some of the worst...
The cross brace was so brittle and rotted it crumbled in my hand. This cross piece must have collected the water that was shedding down the back of the trailer and spread it across the plywood panel under it. As you can see in this photo the panel is completely gone directly under that point...
I removed the two panels right above in the last photo. I was able to see that at one point the street side of the trailer had a leak in the corner. This is indicated by the color and the delamination of the plywood strip. It isn't the worst I have seen out there but it's never a welcome site...
The curb side edge looks a lot better...
You can see that it isn't dark colored and the nails have little rust on them. I hope I find more in good shape like this but I'm guessing no.

Sooo... That is a little bit of everything.

Stay tuned for more...

Sunday, April 10, 2011

Screen Door Rehab...

Having a job is great when you need to pay a few bills but it doesn't facilitate a lot of trailer restoration. Soooo... It has been slow going. I have off a few days in the next month so perhaps it will speed up around here. Lets get to it...
Here is the screen door still mounted in the trailer. At first glance it doesn't look too shabby but looks can be deceiving...

The door was pulled not long after getting the trailer and stripped of all the crap. There was broken plastic bits, leather straps, and odd brackets screwed into it...


I'm not sure what happened here. I'm not sure if they pulled it or if the wind ripped it off. It was removed at one point and put back on with more holes. Hopefully this doesn't cause problems down the road when I have to reinstall it...
I did a quick wet sand and tried to even out the surface. The frame was pretty scratched and banged up. When you polish that it just points out the flaws. The frame did need the attention. The surface was gritty which means that it is starting to oxidize. Let it go and it will start to pit. Most of the scratches came out. The dents remain. There is no way to fix that on a frame like this. All of the extra holes will get some attention also. The door frame got a polish which was a huge pain. I struggled to get it done on the 6" buffer and a bit of polishing with the drill. After I also wanted to add some pieces to the door to add some stiffness and dress it up a bit. The door had a too much flex in it. This may work. It may not. I used flat stock aluminum from Menards that I trimmed to size. I put three cross pieces near the slider and one on each end. I drilled a few "speed holes" in the 3 near the slider just for some style. It is a hot rod trick thing that I really dig. I think it looks cool on aluminum. After I polished them up very quickly and I then riveted it to the frame. I then installed new aluminum screen and splines. Sorry, I really don't have pictures of this process but here is the end result...


And here are the cross pieces with the holes drilled in...

There was a bracket here that was removed and filled the holes with stainless screws and finish washers...
Here are my favorites...before and afters...

I added a chrome dished cabinet knob on the inside. There was a hole there anyway so what the heck. You can see that I filled a few smaller holes here and there with aluminum pop rivets. It looks a lot better than a empty hole...

I am sure that the polish will make this a scratch and fingerprint magnet for a while until the finish dulls. I am fairly happy with the way it turned out. It is JUST a screen door. This may seem silly to post piece after piece when I get them done. However, in this case the trailer as a whole may be measured by the sum of it's parts. Ok, that was lame but it is true. I hope that the attention to detail will pay off in the end. More to come...

Thursday, April 7, 2011

Shelter Sweet Shelter...

Some work to make more work...

I finally had time and decent weather to get the shelter put back up. It was a pain but it will facilitate the work that needs to get done later. The broken pieces were replaced and the tarp patched. I anchored the shelter with a much better system to replace the previously broken anchors. Here it is back inside the shelter...


I even installed 3 shop lights to give some general overhead lighting. I will use other work lights that I can move around in and around the trailer when I need it. These lights will allow me to work past sun down...

The shelter is large but you can see that it is a bit tight on the sides. I gave myself more room on the curbside for the door to swing. I will have to move the trailer to really work on the street side...

Here is the damage that occurred when the shelter was blown around. It is not the end of the world but I was excited to find a trailer that needed very little skin repair. This repair is in such a unfortunate location. It isn't a simple fix...

Hopefully the shelter will make the rest of the restoration easy and quicker than if we had not had it. I am crossing my fingers that the shelter stays up this time around. No more wind storms please. Stay tuned for more soon.

Thursday, March 31, 2011

Louise and the Blustery Day...

A few folks have asked about the status of the trailer resto. I don't have any progress pictures or before/after shots. Just a little tale. Well, it goes a little something like this...


Last October my folks grew tired of listening to me complain that I had nowhere to fix the trailer. A nice sized Shelter Logic shelter went on sale at Menards and they were awesome and plopped down some cash for one. My Dad was cool and not only helped me go down to Janesville once to pick up the shelter but went back down again to get the second box that should have came home with us the first time around. Dad also helped me put together the shelter skeleton which is a pain but we got it done. We put on the tarps later with the help of my friend Kurt. All was well. I was happy as hell. I thought the shelter would serve as a great home for the trailer this last winter. Things didn't remain great for long.

About 1 week after getting the shelter up we had some trouble blow in. We were set to have a pretty good size wind storm come in one day. I thought it would cause some problems but wasn't thinking it would cause the catastrophe it caused. I had come home from work in the morning and waited up for a guy that was set to come to do a home inspection around 11:00am. The wind had already started to blow by the time I had gotten home. I went out and put a few more good sized stakes in the ground to help out the insanely small sized anchors that came with the shelter. I was planning to get a better set of anchors in the ground at some point. It just didn't happen in the small time frame after getting the shelter up.

Anyway, I kept looking out the window a little nervous about how it was going to fair in the increasing winds. About 15 minutes before the guy was suppose to show up to do the inspection I looked out the kitchen window to see the shelter crumpled in the front and in a odd position. I raced outside to find the shelter had broken some of the tiny cables and pulled a few anchors and stakes out of the ground. The back of the shelter had been blown up on to the Shasta. One of the feet of the shelter was blowing back and forth on the skin making a deep rut in the aluminum and opening part of the Pittsburgh seam. I pushed the shelter off of the trailer and tried to hold it down while I though about my options. While I was struggling trying to hold the shelter in place with my weight the winds kept blowing. The shelter was a horribly shaped kite in the wind and literally picked my big ass up off the ground and threw me into the back of the trailer a few times. So I franticly called Molly to call the inspection guy and cancel the inspection. The guy ended up showing up while I was using my body weight to hold the shelter. I told him to just do the inspection while I figure out what to do. Molly raced home and helped me hold the frame as I tried to take off the main tarp. Once I got the main tarp off the skeleton was more manageable to stake back down. The skeleton was bent up a bit in the front door area but wasn't that bad over all. Just a bit out of shape. I moved the trailer out of what was the shelter and inspected the damage a little closer. So far I haven't been able to see any cuts in the skin so that was one plus but it will be a lot of cosmetic repair besides repairing the Pittsburgh seam.

We left the shelter staked in place while we waited for the storm to stop and I could get some sleep. The storm went on for another 24 hours or so. It wasn't done doing it's damage. The back fixed tarp panel of the shelter isn't easy to take off so we left it in place. That panel acted like a sail during the remaining winds and crumpled the rest of the shelter down to the ground. The winds had broken many of the bolts and twisted and bent a bunch of the poles. Later I took down the rest of the shelter. I placed a order for almost 200 dollars in replacement parts to Shelter Logic. I was defeated.

I hate to sound so dramatic about the situation but that was how I felt. I pretty much threw a tarp over the Shasta and walked away. I didn't want to think about it at all. I was pretty burnt out by that point. I think it was about a month ago I started thinking about the project again. Sooooo.....

Right now I am putting up the shelter again. I am also working again on the front window restoration and rehabbing the screen door at the same time. Before the shelter incident I was scraping up the crappy linoleum and original tile in the Shasta. Once I can open up the trailer again I will be trying to finish up that mess. I have a ton of work to do. It is a bit daunting at this point.

Stay tuned for more!

Thursday, March 24, 2011

VSTF Stickers Now In Stock!!!


I am happy to announce that VSTF stickers are now for sale. The stickers are printed on outdoor grade vinyl and measure 4.5" X 3". These are premium quality stickers and should hold up to weather on your trailer or tow vehicle.

The price for these stickers are $5.00 USD EACH or BUY 3 & GET ONE FREE.

The price includes shipping in the US.

Please see the VSTF thread for more details...

Thursday, July 22, 2010

Reconditioned Spring-A-Grab Handle...

It's all about little victories with "Louise".  I like to tackle the little stuff while doing the big things. One reason is to to take my mind off of being bogged down on a big project. The other reason is to have stuff like this done when it comes time to button everything back up. 

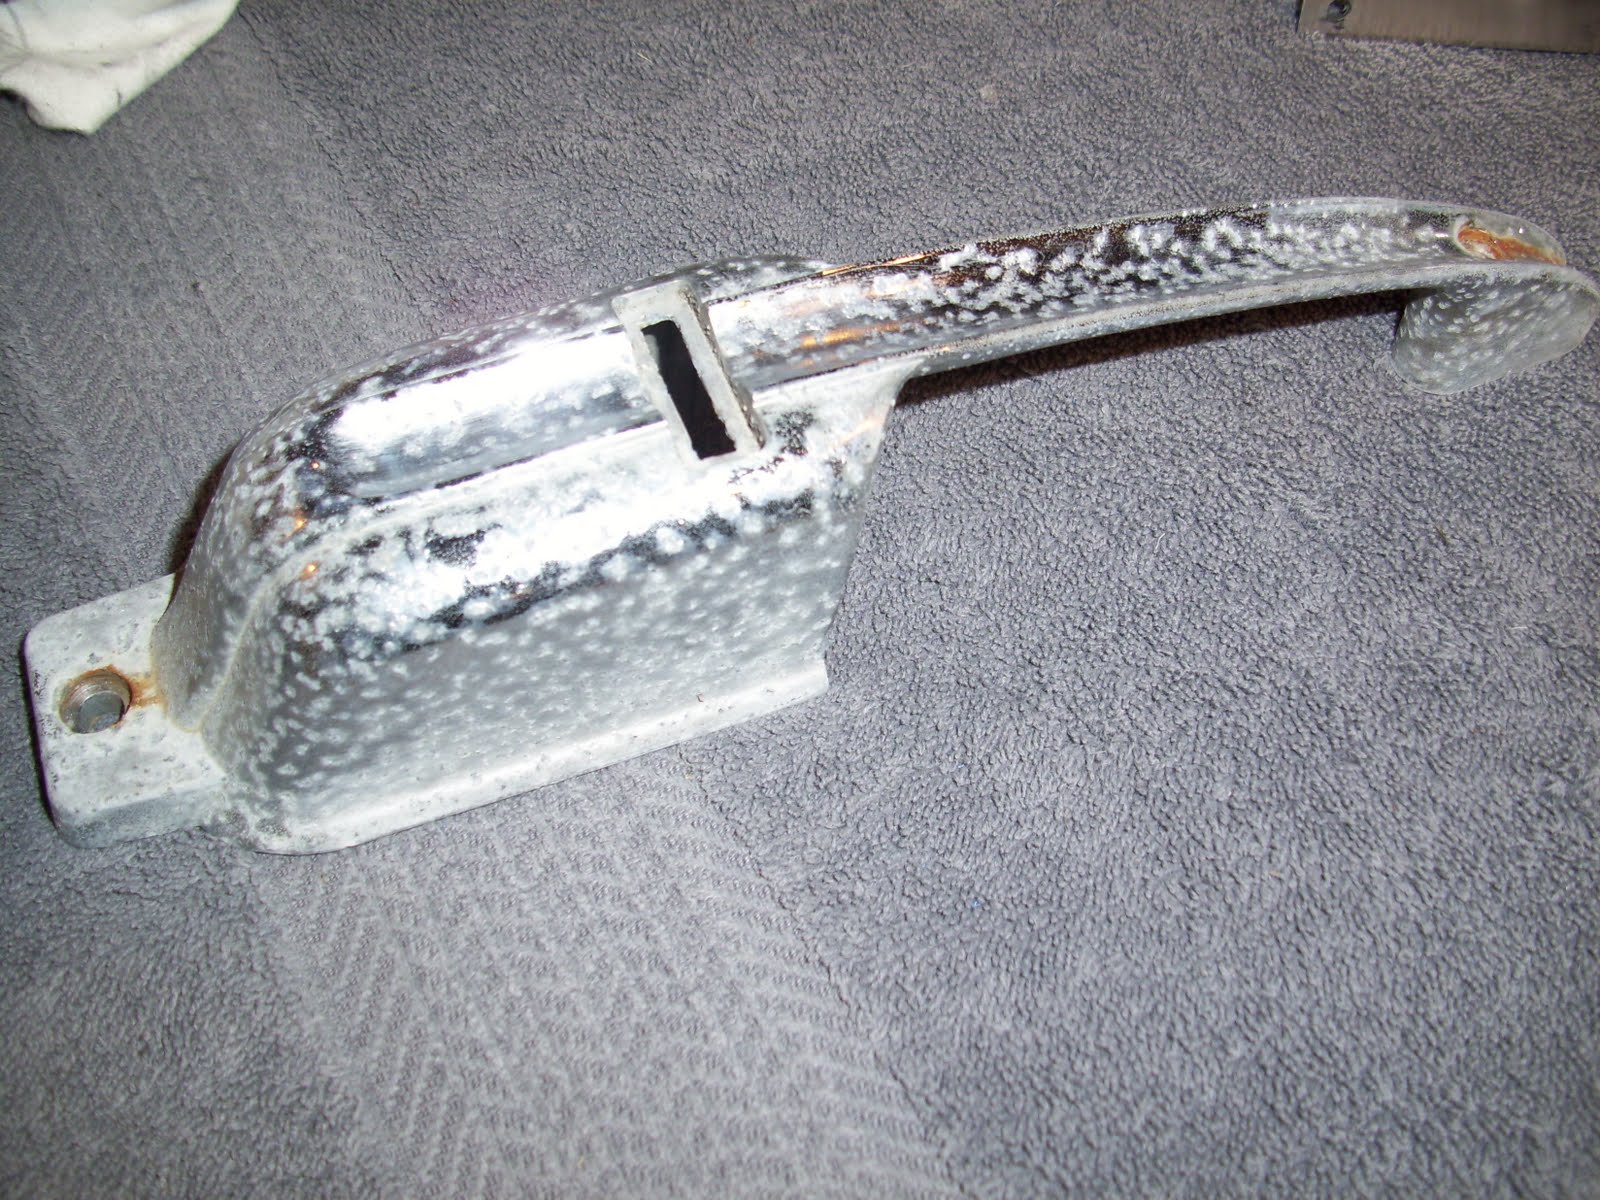
As you can see our Bargman Spring-A-Grab handle shown below is in real rough shape. The crappy pot metal these things are made of don't hold up real well. The thin chrome job they were given chips and flakes off exposing the metal below that quickly starts to oxidize and begins to pit badly. This isn't something that can be buffed out of the chrome. The chrome is basically gone. I would love to get these original pieces re-chromed but that may be a huge waste of money. Besides a few pieces sent to the chrome shop would be out of our budget. I thought I would paint instead. 

The picture of the handle prior to hitting it with a wire wheel to remove the flaking chrome and scuff the surface...
After wire wheeling the hell out of it and hitting a few spots with some heavy sand paper I cleaned and sprayed the first coat of primer. You can see that I am using Duplicolor Self Etching Primer. I thought I would give Duplicolor a shot even though it is a little bit pricey Vs something like Krylon. I would think of using Rustoleum if I hadn't used Duplicolor. I have had good luck in the past with some of Rustoleum  products but went with a the Duplicolor because they spray well and seem to look real good. I'm not sure about durability but we will get into that more later...
You can see here that it the pitting looks like the surface of the moon...
The pitting is so bad that a filler is needed. I thought for a bit that I could use a Filler Primer but it was really just that bad so I used Bondo's Glazing & Spot Putty. The stuff works real well. Just spread it on and sand it down. Once you sand smooth just go ahead and prime with a regular primer. I went back and forth sanding and priming until I figured it would be fine to spray the top coat...
I used Duplicolor's Chrome paint. It laid down real nice. I can't rally complain. It looks pretty good for a rattle can paint. I could have done better with the filling and sanding the primer to give me a smoother overall finish. One reason is I didn't because it started out as a test to see if the process would work. Second is that it is just a stupid grab handle...


Here is my big reservation... I hope it holds up for a few years. No chrome paint is ever real tough. I'm just hoping that it isn't a chipped and cracked mess in a couple seasons. Time will only tell. At this point I'm pretty happy with the outcome. The Bargman licence plate light will soon get the similar treatment. I believe that the interior lights will also. Stay tuned for those.