Thursday, April 29, 2010

Curb Side Jalouise Window Part 2...

Made more progress and was able to get the window riveted and back together...

I ordered new aluminum DF11-10-ST rivets from Hanson Rivet & Supply Co. I have to say thank you to VSTF member Joek for the information on which rivets to buy. They are spot on and were a needed replacement.  I bought the overpriced squeezer dies from Hanson to set the rivets but didn't get the hand tool to put the dies in. Those tools are CRAZY expensive and I didn't want to blow more budget on something like that. Having done a bit hand riveting while leather working I knew I could do it with a hammer. The softer aluminum rivets are pretty easy to set unlike something like a steel rivet. I just took the bottom die and placed it in a mini vice I have. The other die got stuck into a socket screwdriver that was just about the right size. I set one on my own and it worked fine. The problem was I needed another hand to hold the part while I held the screwdriver and hammer. I roped Molly into the project and she became that third hand. She was a good sport about it and was a big help. The rivets were pretty easy to get to roll and flare. 

Here you can see the steel rivets the Hehr factory put in their windows and the new replacement rivets in the cleaned up parts. You can see some pitting on these parts still remains but overall they look a hundred times better...
Here you can see the right side (as you are looking at it from the outside) with the new felt weather strip installed. 8 rivets per side. Some advice for anyone out there taking their Jalouise windows apart: Take pictures before you take it apart. That way you know how to put it back together. It can get a bit confusing and you don't want to have to drill out rivets you just set...

Here is the outside of the window. As you can see the steel rivets are done and barely holding on. Shined up and new aluminum rivets now set. They will probably last longer than the trailer...
Here is the whole window before and after. The after is missing the insect screen in the picture...
Here you can see the bulb seal and the felt strip weatherstrips...
Just some details. The window works so much better and I'm not so worried about breaking the opening mechanism gears...
And thats really is about it. I have been saying that I will do a in depth step by step for folks that want to redo their Jalouise but that process is pretty time consuming. I just want to keep moving on with the project. Thats it for now.

Ironing Board Storage Bracket???


Alright boys and girls...

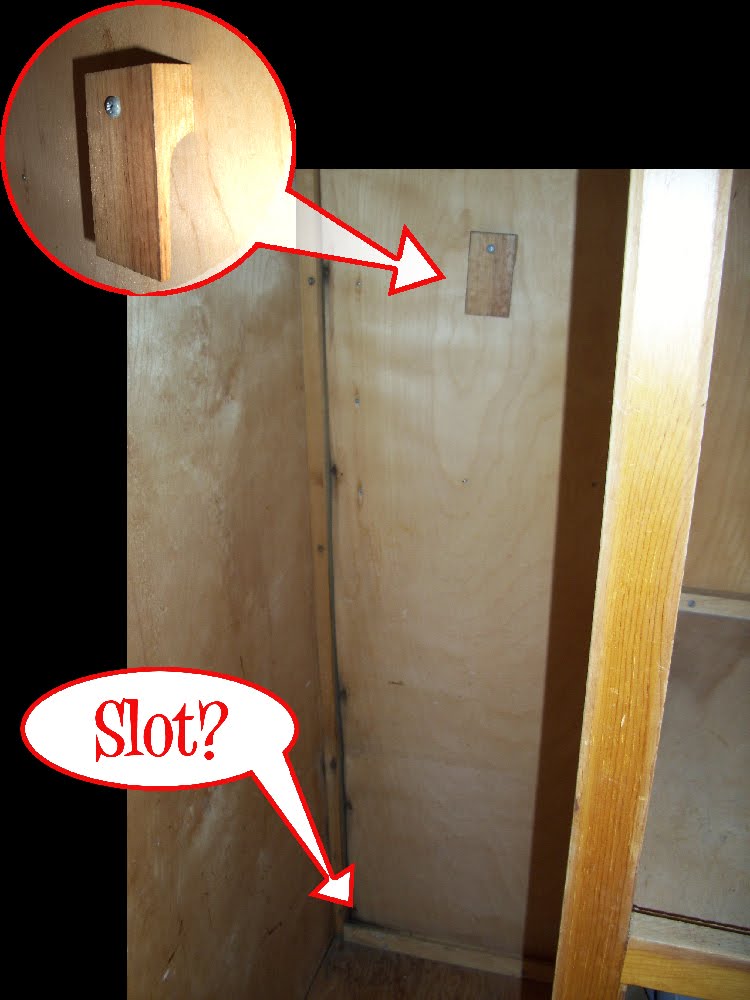
What the heck is this. Is it a storage area for one of those cutting-board-slot-mounted-ironing boards?

This is in the back of my long cabinet on the curb side. I am wondering if it is factory. I know some trailers came with the ironing board that slid into the cutting board slot. The bracket looks pretty decent in it's construction like it could come from the factory. The bracket rotates on the one mounting screw. Whatever it secures would be flat enough to sit against the back of the cabinet. There appears to be a slot in the bottom of the cabinet that would accept something like a board.

I dunno. Anyone have an original ironing board the could measure? If I have the measurements for one of the ironing boards I think I could determine if it is mounted in the right place to fit one in. I'm really curious about this.

Wednesday, April 28, 2010

Curb Side Jalouise Window Part 1...

I had a pretty good day today. I pulled the "kitchen" Jalouise window and a few drip caps to get polished. I also removed a lot of the stuff from inside the trailer. I pulled the interior lights, bunk brackets, and started removing the cabinet doors. Nothing major but it really gives you a idea of what you need to wrap you head around and concentrate on. I hope to soon sand and re-shellac the cabinet doors and drawer fronts. It isn't mission critical but something that can take awhile and there isn't reason to rush a project like it. I'm still tackling one thing at a time.


Ultimately, I still need to find a shelter to get the trailer in so I can really dig into it. I can't move ahead with pulling some of the skin back and repairing some of the rot. Opening up the trailer to get things repaired to move ahead with the projects needs to happen at some point. My painting process itself will take a few days itself. I have been trying to track down one of those portable shelters that I can store it under. Most I find on Craigslist are too small, junky, or not tall enough. Cheap is the name of the game here. I don't have a budget that I can just go to a supplier like Shelter Logic and buy one so I have been scouring Craigslist trying to find a used one that works. I will keep everyone in the loop on that side project.


Back to the restoration...


Here is the curb side Jalouise window. I pulled this window a while ago. You can see most of it in that jumble of parts I showed you before. I pulled it apart to really give it a good polish. Unfortunately you can't do that when the window is whole. One of the downsides of these windows is the the were assembled with steel tubular rivets. The rivets on my Jalouise widows are almost completely gone. I will be replacing them with aluminum rivets. The level of oxidation of the aluminum was surprising also. I really wasn't expecting what I found. There was quite a bit of pitting on some parts like the lower sill. The rubber seals were hard and brittle and there was hardly any pile left on the strips. Everything will also get replaced. Here is the window straight from the trailer...
I really didn't take too many shots of the window before I disassembled it. Everything got the wet sand and polish treatment. I am still loving that buffer. It does a great job on these thicker frame pieces...
Good looking stuff...
Here are the glass holders and rods....
And thats it for now...

I did get my new rivets. Now I just have to set them, reinstall the seals, and reassemble the window. Look for a part 2 soon.

Monday, April 19, 2010

More Shiny Stuff...

Not a huge post today but sometimes it's the little stuff that counts...

I finished up some of the window trim today. Here you can see the small bathroom window interior trim (inner), the curbside Jalouise window insect screen frame (middle), and the curbside Jalousie window interior trim (outer)...

They turned out alright even though the 6" bench buffer likes to grab these really thin pieces and try to turn them into pretzels. I learned a small trick to take a long thin piece of 3/4" scrap plywood and hold it in inside the 90 degree angle to support the thin frame. This allows you to put some pressure on the piece without bending it. This also doesn't allow the wheel to grab the edges of the trim. I did have a few times before the wooden support where the buffer would yank the trim and damage it. Oh well. Live and learn I guess. 

Here is then curbside Jalouise window drip rail and the small bathroom drip rail. The side by side of the before and after really shows how the wet sanding along with the new buffer really does a nice job...


I have actually crossed this pile of parts off of my polishing list. I am just waiting for my new rivets to come so I can can put my Jalouise window back together. I hope they come in a day or so. They better. I'm getting worried. Anyway... I will update this when they do finally show and I'm able to get it back together.

Sunday, April 18, 2010

Hehr Bathroom Window Resto...

I managed to knock another window of the list today.

The Hehr Standard pop-out bathroom window really wasn't in bad shape. The textured glass was there and solid I have noticed that even though there isn't much damage the aluminum on all of the trailer's existing windows was starting to oxidize. It is a good thing they are getting attention now. I disassembled the windows and wet sanded all of the aluminum.

I picked up a 6" Craftsman Buffer from Sears the other day. WOW... what a difference it makes in polishing. I still use my drill and buffing cones to get into the hard to reach places but the 6" wheels really get the shine to come out quicker and is less mind numbing.

Once polished I put in a new Hehr gasket from VTS and reassembled the window using their Hehr Standard fasteners. I think it turned out real nice. The polish looks so much better than the last window.

Click on the pictures for a better view...
SHINY!!!
The details. You can actually read the Hehr LA Calif now...
One more down...

Friday, April 2, 2010

Quickie Update...

Because I know someone out there cares...
I'll be wet sanding until my hands fall off.

Thursday, April 1, 2010

I'm in a downright foul mood...

First: The Formica dinette table top epoxy experiment failed. The two part epoxy was just too thick and wouldn't spread out real thin for me. I attempted to squeegee the epoxy so it would lay down in a nice thin layer while filling the voids and making a nice shiny layer. This didn't work. It just started to streak. So ultimately the finish is uneven and rippled. No good.

I don't think even wet sanding would solve the problem. SOOOOO.... We are on the market for new laminate. Not really what I wanted to do but maybe this will be something that will be better in the long run. Now that the yellow Formica is going bye-bye we may even be changing the color schemes we had picked. The jury is still out.

Part two: Vintage Trailer Supply started carrying a new product. Now that isn't the bad thing. I'll explain. First the product...


This kit includes most of the small parts you need to refurbish your 1950s Bargman Trail-Lite license light.

Kit includes:
  • bulb socket with single pigtail
  • bulb
  • custom gaskets for both ends of glass lens
  • two stainless cover screws
Kit does not include:
  • main casting
  • clear glass lens
  • outer cap (red lens version sold separately)
  • license bracket (sold separately)

Awesome huh? Even has a decent price for $9.99. What is the bad part? The kit does not include the clear glass cylinder lens. Today while messing around with my Trail-Lite and trying out the new red glass outer cap lens the clear glass lens fell off the table and shattered. The lens was cracked but I was going to use it anyway with a cleaning and some epoxy to help that crack stay together. Not now.

Does anyone know where to get something that can act as the clear lens for the Trail-Light? There has to be some cylinder shaped object that can be modified to work. I looked through our spice cabinet looking for some container that could be cut to work. Nothing. I'm sure I may be able to find something that works somewhere. I just figure that someone else has solved this problem.

Nothing left to do but wet sand some aluminum... blah.

Monday, March 22, 2010

Space City Trailer Club Patch...

I picked up this trailer club patch off of Ebay. Finally got it today...
I'm not sure how old it is. The image of the trailer and the chain stitching suggest it is is 60's. Houston didn't receive the nickname Space City until 1967. I suppose folks could have been using the nickname before the city gave themselves the name? I dunno. I couldn't find anything about this club. I'm guessing they are defunct. I love the patch though...
It is a nice big patch too. 5.5 inches X 11 inches. Now I have to find a vintage style jacket to put it on. The weird part... I bought it from a guy in Canada. How did it get way up there???

Sunday, March 21, 2010

Dinette Table Resto...

Started work on the dinette table. The PO had covered the original yellow and gold flecked Formica with a thin white cheapo formica type stuff. You can see from the picture below there is quite a bit of glue still on the yellow Formica even after I scraped a bunch off...
This sucks. Thats all I can say...
A picture of nails? Yeah. This is something that should NOT be used anywhere near aluminum trim. Ring shank nails. WHY!?!?! Some days I wonder where some folk's heads are. Once they laid down the crappy white Formica stuff they reattached the trim piece with ring shank nails. As Red Dirt would say... this does not make me happy...

Once I got the aluminum trim off the top Formica comes right off. It is glued to Masonite. The Masonite is not attached to the plywood table. I found this logo. From what I can tell is that Roseburg is still in business but they don't make Resin-TITE anymore. I don't know why but I love finding stuff like this...

I spent some time with a scraper and a whole lot of Goo Gone. There is a few problems that need to be addressed...

There is a few deep scrapes and the dark spots. I tried to get the spots off but they aren't going anywhere. The gold flecks that are at the surface actually rust. 

I think the dilemma here is that we actually want the original Formica if we can keep it. We dig the vintage aspect of owning a vintage trailer. So keep the chewed up Formica or replace it? Thats the dilemma...
If we decide to keep the original it needs some protection. I was thinking of getting some of that 2 part epoxy that is made for bar tops. If it was nice and thin it could serve as good protection and fill some of those deep nicks and scratches. It won't get rid of the dark spots but maybe the dark spots add to the character. Maybe not. Maybe a material replacement is the better route. Anybody have any ideas? Let me know.

The table leg is a bit chewed up also. The damage is from a eye bolt in the floor. Not sure how to remedy this. I may sand the whole leg and turn it around so the deep scratches are facing the rear. That or replace the whole leg with new wood...
I'm also not real excited about this aluminum hinge on the leg. It isn't the most secure and a bit bent up. I bought a new heavier hinge to swap this one out. I also have to sort out a way to hold the leg in the down position without that stupid eye bold in the floor...

Even the aluminum trim was a pain. It is so big and awkward that polishing is a pain. But it is done. The areas around every hole is sorta messed up from pounding in those nails...

I need to come up with a few solutions before I move forward on the table. I will keep everyone posted.

Interior Trim...

Just a quickie post...

I pulled all of the interior aluminum trim pieces to clean, wet sand and polish. Mostly counter top trim. There is a sink trim piece and the roof vent trim piece there also...


The good ol' before and after shot...
They were a bit scratched up from general wear and tear but they will be fine. I can't wait to re install them. However, that is long down the list of things to do.

Tuesday, March 9, 2010

More Parts...

Not the most exciting thing in the world but I got a drip rail knocked out. Luckily the drip rail for the rear window that was removed for the AC unit was saved and found in the trailer. Here we go...

 Here it is in the raw. It isn't in real bad shape just needs a polish...
I started wet sanding with 400 grit and 600 grit. Finished up with 1500 grit. I did this all very quickly but it needed the corrosion removed...
It still had the dried putty on the back of the drip rail. I use a very fine wire wheel chucked in my drill to go at the crud. I only use the wheel on the back of the drip rail because I think the wheel is too aggressive for the front that I want to be very smooth and shiny. The point is to get nice smooth surface for the new putty to stick to when it is reinstalled on the trailer.
The backside cleaned of any residue...
Here is the front side again. Now polished. I'm still not happy with the final product but it is much better than when is started. Like I said before, the thinner aluminum does give up a real deep reflective shine that other thicker pieces do. Oh well.
This shot is only because I love the before and after shots...

One down... 8 more drip rails to go.

Friday, February 26, 2010

The Best Trailer EVER Is Now For Sale...

On the Atomic Addiction blog I did a tiny write up about the 1960 Holiday House Model "X" (later named The Geographic). You can see that HERE

I loved this thing the first time I saw it. The trailer is very rare and is now for sale on Craigslist of all places. Here is the info off of Craigslist...


1960 One of A Kind Retro Trailer Home Original Showroom Model - $135000 (West Hollywood)


"For sale is an original prototype, showroom model Travel Trailer built in 1960 with a design years ahead of its time. This "Trailer for the Rich" was designed by David H. Holmes, owner of Harry & David, and Chuck Pelly, an engineer and designer of BMW race cars.
The "Geographic Model X" was originally listed for sale in 1960 for $8,495 (In 1960 you could buy a house for $13,000). It includes a living area with two (2) fold out sofa-beds, kitchenette with teak cabinetry, Original Norcold Refrigerator and two pairs of wall foldout Magic Chef brand gas stove burners and a Magic Chef Oven (all appliances are in perfect working condition). Original receipts, invoices, advertisments and promotional items have all been retained and preserved (available on website below). I purchased this trailer and put my heart and soul into restoring it. This is my personal luxury antique one-of-a-kind land Yacht! There has been tremendous media buzz regarding this unique trailer in the LA Times, the Harry and David Frutier and other publications.
You can find a full description, history, and additional pictures at ***** 
http://www.1960prototype.com  This antique, one-of-a-kind trailer should only appreciate in value, unlike new trailers that will be guaranteed to depreciate tremendously. Serious buyers only please. Please reply to this post and I will contact you back at my earliest convenience. Willing to consider possible 1035 exchange. I hope you enjoy this piece of history and I look forward to speaking with you soon. "
-
In my opinion the inside is a bit too nice and modern. Some how it looks like some swanky modern hotel on the inside and an awesome Jetsons car on the outside. HOWEVER... if you have $135,000 to buy it I would bet you have the kind of money that you could make it look like anything you want. Really it doesn't matter. I think it belongs in the RV/MH Hall of Fame. It just wouldn't seem right camping such a rare travel trailer. I wonder if it will sell???


Updated Listing: http://losangeles.craigslist.org/wst/rvs/1626155500.html

Saturday, February 20, 2010

Hehr Window Restoration (Part II)...

I had an opportunity to finish up work on the rear window. You can see part one here. A few more hours of work has brought me here...

I continued cleaning up the main inner and outer frames of the window. On the left you can see the inner frame when I got it. After it didn't shine up REAL well but it looks a lot better...
You can see the new replacement galvanized window screen from Vintage Trailer Supply is now installed. I had to use pop rivets to re install the retention "?" plate rather than the large tubular rivets that were originally on them. Works fine and it's hard to notice the difference. Those plates look good don't they?..
These "U" shaped channels that support the inner window frame was one of the worst parts of this whole restoration. What a pain in the butt. They were really messed up but the hardest part is that they are small enough that it is almost impossible to get real good tools in there to clean out the corrosion. It took forever and it isn't great but it is better than before. The spring loaded plate now rides freely...
I had some new glass cut and I replaced the smoke damaged plexi-glass. I also installed the new Hehr standard glass seal and glazing tape from VTS. I did notice when trying to polish the frames and thinner pieces of the window that they didn't shine up as great as I liked. Oh well. What are you going to do?

New nuts and screws from VTS. You can see some more of the corrosion that wouldn't leave...
Here you can see the glass frame joined with with the main frame...

Man... these things turned out nice...
And opened up...
One more beauty shot. I love it....
Ultimately, it took a lot of work but I'm pretty happy with it. Now on to more and more parts!